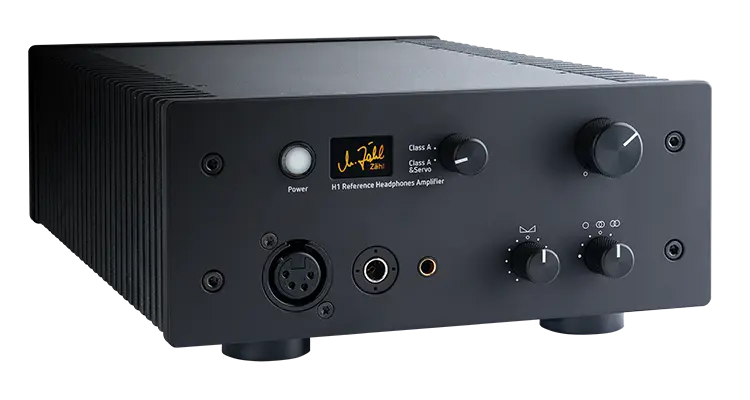
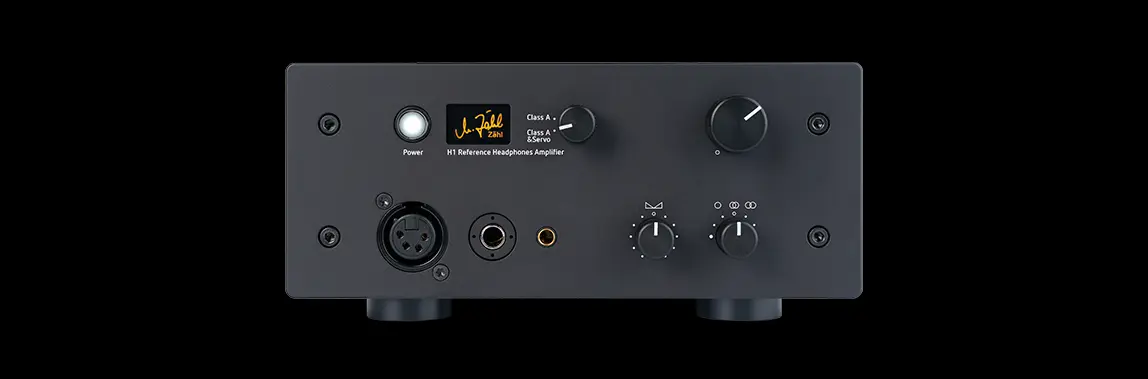


Zaehl H1 Reference Headphones Amplifier.
Zaehl H1 Reference Headphones Amplifier.
 Guaranteed In Stock
 Free delivery 3 - 7 days
 5-year-warranty
 Trade in product
 Book a Demonstration
 Available to collect immediately
£6,599

Features
- pure analogue design
- consistent dual-mono layout
- logic circuits without clock generators
- Integrated toroidal mains transformer with specially designed Mumetal housing
- straight linear power supply
- No external power adapter needed
- no-compromise selection of components
- no-compromise interior and exterior construction
- perfect impulse reproduction
- ultra-wide frequency response
- extremly low impedance output precisely controls complex loads
Specifications
|
Category |
Specification |
|
Headphone Output |
Class A: 0.8Ω impedance, +23 dBu max level |
|
Class A & Servo: 0.045Ω impedance, +23 dBu max level |
|
|
Unbalanced / Dual mono design |
|
|
Output Power (per side) |
RMS: 4W @ 30Ω, 7W @ 15Ω |
|
Peak: 7.6W @ 30Ω, 11W @ 15Ω, 12W @ 10Ω (18W for 1.5 ms) |
|
|
THD (Headphone Output) |
Class A: 0.07% |
|
Class A & Servo: 0.0005% |
|
|
Frequency Response |
10Hz – 30kHz (±0.05 dB) |
|
1Hz – 500kHz (-3 dB @ +6 dBu) |
|
|
Line Input Impedance |
20 kΩ |
|
Max Input Level (Balanced) |
+23.5 dBu (0 dB gain), +29 dBu (-10 dB gain), +13.5 dBu (+10 dB gain) |
|
Max Input Level (Unbalanced) |
+23.5 dBu (0 dB / -10 dB gain), +13.5 dBu (+10 dB gain) |
|
Gain |
-4 dB (-10), +6 dB (0), +16 dB (+10) |
|
Noise (Headphone Output) |
-101.5 dBu (Vol max, Gain 0) |
|
-104.5 dBu (Vol 50%, 20Hz–20kHz RMS) |
|
|
-104.0 dBu (Vol max, Gain -10) |
|
|
Power Supply |
230V / 115V AC, 50–60Hz (switchable) |
|
Power Consumption |
43W typical, <0.5W standby |
|
Mains Fuse |
5×20mm, 0.63A (x2) or 0.8A (x2) time-lag |
|
Dimensions (Unit) |
195 × 90 × 300 mm |
|
Weight (Unit) |
Approx. 4.5 kg |
|
Boxed Dimensions |
410 × 410 × 180 mm |
|
Boxed Weight |
Approx. 6.6 kg |
Description
H1 Reference headphones amplifier.
Reference Amplifier with unprecedented transparency and precision, attention to detail and massive power performance. For both high-end enthusiasts and professional users. Designed and manufactured in Germany.
Special Features
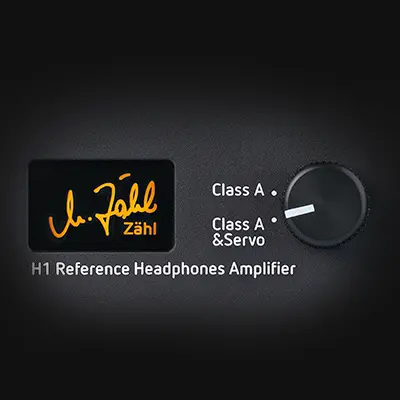
Unique: Class A power and a step beyond
- switchable negative feedback [„servo“] while maintaining Class A operation
- Class A power amplifier in its purest form
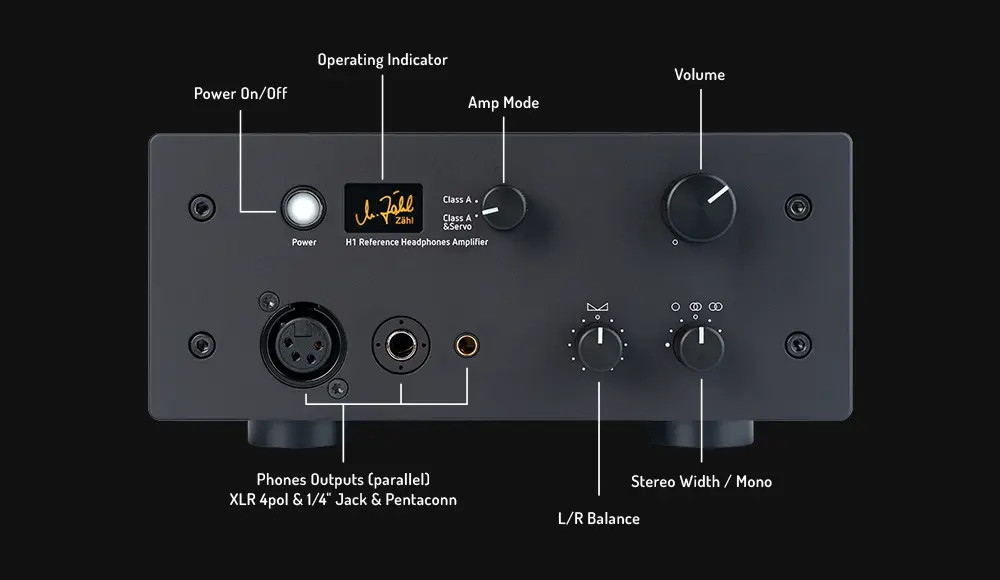
Stereo Base Control
Stereo base control for adjusting the sound stage to your preferences. Precision tool for widening or narrowing the stereo image or switching to mono.
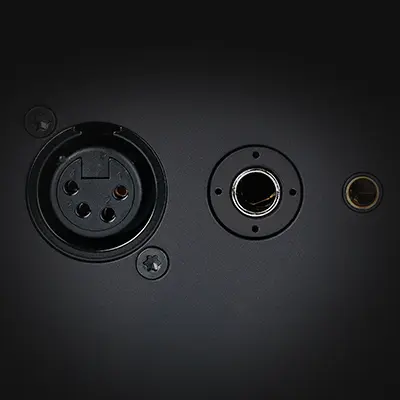
Three output connectors
XLR 4-pole – ¼” Jack – Pentaconn
POWER STAGE
Class A – H1 realisation
The H1 power stage provides massive power reserves, which is already evident from the fact that it consumes almost 40W in idle mode. The output power is more than sufficient for any application, and in the millisecond range, it is increased substantially. The output resistance is remarkably low. The optimum operating point of the power stage was first specified by theory, then by measurements on the sample units and finally fine-tuned during numerous listening tests with experts, especially mastering engineers. The same applies to the selection of components. This meticulous way of design largely compensates for the possible disadvantages of Class A described in the theory paragraph below.
Class A & Servo – H1 realisation
To take Class A one step further, we implement an idea which is as simple as it is ingenious: We take the best of Class A and the best of negative feedback amplifiers and put them together: Class A operation is supplemented by negative feedback (“Servo”). Since there is no crossover distortion, there is nothing for the feedback circuitry to correct. Rather, it only corrects the errors which result from the interaction between the power amplifier and the headphones. The feedback path is designed in such a way that no artefacts are created by the correction. The output resistance drops to a value which is smaller than the sum of the headphones’ cables and connectors. In this way, headphone systems can be controlled precisely. One can say that with the H1, any headphones sound as they should.
Why Class A and Class A & Servo?
The previous paragraph may lead to the conclusion that the optimum is achieved with Class A & Servo operation. So why do we still have the switching option? Quite simply because we judge our circuits by ear. Our Class A amplifier was developed with the highest musical demands in mind. We experienced that it does not sound the same as the servo version, but it sounds equally outstanding. Depending on headphones, music and personal preference, the user can make their choice. We were surprised to find that despite clearly different characteristics and measurement results, the hearing difference is rather subtle.

Stereo Base control
Stereo Base control, a little theory
A special feature is the possibility to adjust the stereo width. The perception of spatiality when listening with headphones differs from listening with loudspeakers. Instead of a cross-feed circuit, we use our stereo base width setting. It is based on the mid/side technique, which is commonly used in professional studios. It provides additional benefits.
The stereo signal is converted into a mid signal (in simple terms, what L and R have in common) and a side signal (in simple terms, what distinguishes L and R). Summing mid and side signals in a 1:1 ratio will result in the original stereo signal. However, if you change the ratio between mid and side before summing them, you change the stereo base width. In our circuit, we leave the mid signal as it is. We only adjust the level of the side signal. If we lower the level, the stereo image becomes narrower; if we raise the level, the stereo image becomes wider.
Stereo Base control: what it does
You have direct access to the perception of spatiality. With a music programme which seems too “wide” in the headphones, one will turn the control one or two steps to the left. If you perceive a recording as too “dry” (centred), turn the control one or two steps to the right. The leftmost position is mono. This is the preferred setting for early stereo recordings, when individual instruments have been mixed to the extreme left or right – without spatial reference.
In the centre position, the stage is completely bypassed by relays.
Professional users check the spatiality of their mix with this function and may discover possible problems, especially in the extreme positions.
BALANCE
A precision potentiometer with 21 detents is available for balance control. The centre position is perfectly calibrated and haptically clearly defined. In fine increments, left/right volume differences of up to about 2.5 dB – caused by music programme, headphones or individual perception – can be compensated.
Headphones Outputs / Balanced Connection
XLR 4-pin, Pentaconn and ¼ inch jack connectors are wired in parallel and are intended for alternative use. Theoretically, you could use them at the same time, as the power amplifier is strong enough. However, for a reference-quality listening experience, we do not recommend such use.
Ideally, XLR 4-pin and Pentaconn are used in conjunction with balanced wired headphones. In this case, the signal currents of the two power amplifiers are not mixed with each other, so mutual interference is impossible. The H1 can unfold its full quality (also refer to the chapter “Dual Mono Design”).
Dual Mono vs. Balanced amplifier design
With its dual mono design, the H1 features the same advantages as a balanced output stage but avoids the drawbacks.
The drawbacks of a balanced output stage are the significantly increased number of electronic components – a balanced output contains two output stages per channel, which work in reverse phase. Two output stages result in doubling the output impedance. More components result in an increased risk of non-linearities.
¼ inch jack compatible
Another advantage of the H1 architecture is that unbalanced headphones with ¼ inch jack plugs can also be operated without any problems.
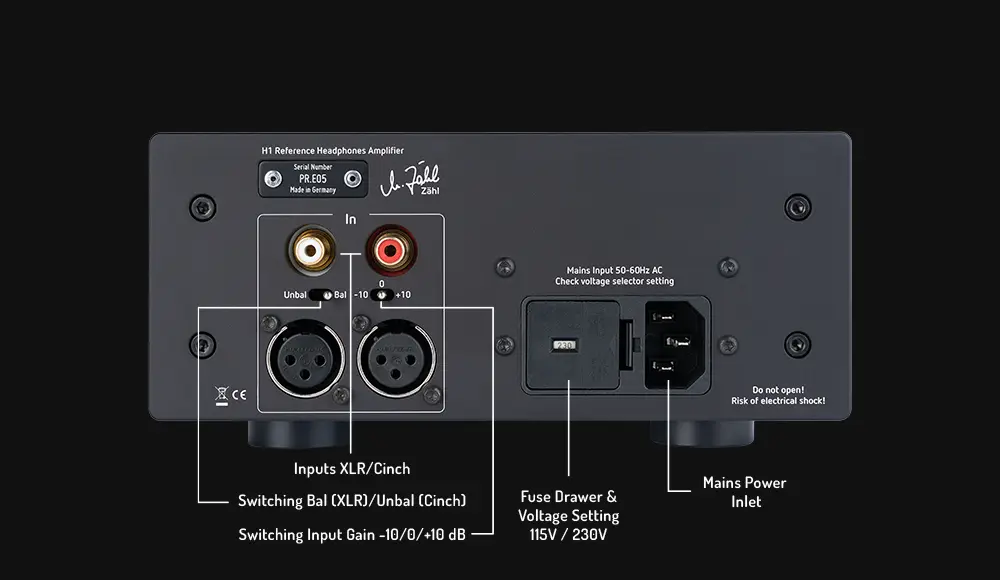
LINE INPUTS
Balanced signals (XLR) or unbalanced signals (RCA) can be connected. Note: XLR and RCA are not meant to be used simultaneously! The Bal/Unbal switch does not select XLR or Cinch, but sets the input to balanced (Bal) or unbalanced (Unbal) mode. Balanced mode behaves transformer-like: hot or cold may be connected to ground without any loss.
Use as a standard:
XLR in Bal Mode: Pin 1=Ground, Pin 2=hot,
Pin 3=cold
Cinch in Unbal Mode: Case=Ground, Centre contact=hot
Use in special cases:
XLR Unbal Mode: Pin 1+3=Ground, Pin 2=hot
Cinch Bal Mode: Case=cold, Center Contact=hot (Ground Lift mode)
INPUT Gain
The basic voltage amplification rate from input to output is 6dB, with the Volume set to maximum.
The 3-position gain switch (-10/0/+10) reduces or increases input gain by +/-10dB. It allows adjustment to sources with different output levels.
It is also useful for adapting to headphones of varying sensitivity. The -10dB setting is recommended if headphones with low power requirements, like IEMs (in-ear monitors), are used.
DUAL MONO DESIGN
The idea
The idea behind strictly separating left and right channels is to keep any interference away from the circuits. A term like “crosstalk” does not get to the core of the matter. Music signals usually have left/right references, so that an extremely low crosstalk value, moreover, usually measured with sine waves, does not mean so much. But with music, highly energetic signal pulses occur, and then high currents are individually demanded by the output stages. It is extremely important that in these cases there is no coupling via a common power supply or via ground lines carrying signal current. Only this way can an amplifier produce absolutely undistorted output signals.
Realisation inside the H1
In the H1, the power supplies for the left and right channels are separate, for preamplifiers and power amplifiers. The mains transformer has independent, completely potential-separated windings for each channel. Rectification, filtering and voltage regulation for each channel are individual. For logic circuitry and front-panel indicators, there is another winding and separate rectification, filtering and voltage regulation.
The ground potentials of the two channels are connected at one point only, but this is done purely as potential equalisation; signal currents can’t be mixed.
Optimal output connection
If the XLR 4-pin or the Pentaconn output is used in combination with balanced wired headphones, the dual mono principle is implemented in full consequence.
When using the jack output, the ground wires of both channels are connected in the jack socket and the jack plug of the headphones. The use of headphones with jack plugs, therefore, is not ideal. In the H1, however, an optimised ground routing ensures that the disadvantageous effects are as low as possible.
POWER SUPPLY
A mains transformer is a potential source of interference. The analog circuits of the H1 are not as sensitive to interference as the ones in the HM1 – due to the lack of an EQ circuit. So the mains transformer could be integrated, but only because it is packed in a massive MuMetal shield.
The mains transformer has separate windings to individually supply the left channel and the right channel audio circuits. Relays and LEDs are driven by another separate winding.
The mains power input can be set to accept 230V or 115V AC 50-60 Hz. When set to 230V it will accept 207…255V, when set to 115V it will accept 104V…127,5V.
Why H1?
Headphones in the professional field
Today, top-quality products allow applications in the professional field which were inconceivable before. While in the past headphones were mainly used during recording, today they are also used by sound engineers for reference monitoring during the final mix. It is essential that the reproduction is pure and does not mask or brighten up anything.
Headphones in the high-end range
Demanding high-end enthusiasts – in general – primarily have in mind to enjoy the music. So why shouldn‘t their headphones or amplifiers shape the sound a little more pleasingly than the recording actually is? Unfortunately, such „sweetening“ cannot be relied upon. What is advantageous for one recording can be disadvantageous for the next, which can also apply to instruments within a recording. If a recording is really good, true-to-life reproduction is always the best option.
Warranty
Backed with a 1- Year Manufacturer Warranty
Delivery Info
![]()
Delivery Information
As a company our primary goal is to provide a seamless service that results in customer satisfaction. We aim to deliver within 3 working days. Unfortunately, there may be occasions where this time frame may not be met due to unforeseen circumstances; in this instance, we deliver product/s as soon as we can. All delivery charges are included within the prices quoted, unless otherwise specified.
All small items are usually delivered between 9am and 6pm, on a Monday to Friday, unless a Saturday delivery is requested. Follow My Parcel is an industry-changing innovation from DPD Local, which will give your customers unparalleled levels of information and peace of mind.Not only will your customers receive a one hour delivery timeslot, but they’ll now also be able to track the progress of their parcels on a map as our drivers make their way to the delivery addresses. Follow My Parcel will: